 If I knew that making Play Dough was so easy, I’d have saved a whole lot of money when my kids were little! For a few dollars you can make gobs of this classic creation with simple ingredients that you most likely already have on hand and are always available at Alameda’s Grocery Outlet.
This is a “recipe” that’s not meant to be eaten, but it is non-toxic and edible, if you don’t mind a whole lot of salt. It takes about 10 minutes start to finish and my Grands (ages four and almost seven) basically made it themselves, with a bit of direction on the amounts and assisting with the stirring on the stovetop. I laid the ingredients and measuring utensils out in the order of adding so they could be in charge. What fun!
This would be a fun project for a child to make for a birthday or holiday gift for a friend. You could buy containers for the play dough, a rolling pin, mini-sized chef’s hat and apron, and cookie cutters at a dollar/discount store and arrange in a basket. There is nothing like seeing the joy and pride in a child’s eyes when they have created something all by themselves!
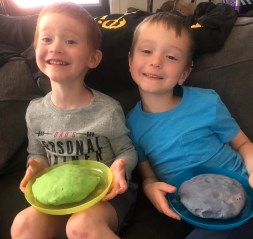
 Variations: You can’t make a full batch of different colors as the food color is added while it is being “cooked” and too goey to divide at that point. Opt for halving the recipe if you want more colors and less dough. (But it’s inexpensive and takes just a few minutes to make multiple batches.) This makes a fairly large-sized batch, as you can see in the pic above, and is a good amount for rolling out to play with cookie cutters or dull knives.
I don’t think there is a need to use any specific brand, and I’m pretty sure if you have an old bag of flour that you no longer want to bake with, that will work just fine. There are many kinds of food coloring available and you do need to use quite a bit if you want an intense shade. My Grands enjoyed mixing colors to get their own particular results … blue and red to make purple for one and green and yellow to make lime green for the other. Remember: if they use all the colors together, it will be a muddy brown.
 Ingredients:
- 1 cup flour
- 2 tablespoons cream of tartar (This is the most expensive ingredient for the amount you’ll use. Resist skipping; this is what will keep it fresh.)
- 1/2 cup salt (yes, “cup” … not tablespoons)
- 1 tablespoon oil (vegetable, canola, coconut, etc., any kind will do)
- 1 cup warm water
- Food coloring
 Directions:
- In a medium saucepan, combine the flour, cream of tartar and salt and mix together.
- Add the oil and water and stir until well combined. It will be lumpy.
- Place the saucepan over medium-low heat and stir continually until the mixture just begins to thicken. (Important: If you have an electric stove, warm up the burner before placing the saucepan atop.)
- Add food coloring, about 4 drops to start, and then an additional 2 at a time, until you get the desired color. (Don’t worry too much about the color not being consistent; it will combine with kneading after it cools.)
- You’ll know it’s done when the mixture is difficult to stir, clings together in a blob and easily lifts off the bottom of the saucepan. The green mixture pic is about a minute from being ready … still a bit gooey.
- Allow to cool five minutes (the hardest part of the whole process!).
- Store in air-tight containers or Ziploc freezer bags with the air squeezed out. If it “sweats” or seems sticky after a few uses, simply knead in a few tablespoons of flour.
Should last six months or until the kids leave it out and it dries up! LOL!
Go To Tuesdays are weekly recipes from products purchased at the Alameda Grocery Outlet, 730 Buena Vista Ave.
Please let me know if you made the recipe and liked it or would suggest changes. And also feel free to suggest future recipes.

